Aspire One Upgrade Options
The Acer Aspire One comes with 1GB of RAM and a 160GB SATA Hard Drive. For an idea of its performance, please check out this video. RAM can be upgraded to 1.5GB by replacing a 512MB stick with 1GB. We recommend the Kingston PC2 4200 1GB Laptop Memory
 . The hard drive can be upgraded with another 2.5 inch SATA hard drive such as the Western Digital 320GB 5400 RPM Scorpio
 .
.
Performing these upgrades are not a simple matter as you have to completely take the netbook apart. Do this at your own risk. It is also a lengthy process so be sure you set aside a good hour of time.
Requirements
Once you’ve picked out your new RAM or hard drive, you’ll be ready to begin the upgrade. In addition to a screwdriver, you will need a credit card. You may also want some bowls to organize screws that get removed and enough space to place removed components. It is also a good idea to use a towel to cover the screen during the process. If you are upgrading the hard drive, you will be losing all the data on the included drive. If you are installing from scratch, then you have nothing else to do. If you want to duplicate the included OS on the original drive, you will need to run the dd linux command to copy it to your new drive. To do this, you will need a 2.5 inch external USB SATA enclosure to put the new drive in to copy to. If you are unfamiliar with this, it is a very similar process to duplicating the drive in a Tivo.
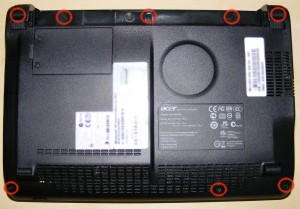
Step 1 – Remove bottom screws
Flip over the Aspire One so that the bottom is accessible. There are 6 obvious screws to remove on the bottom of the Aspire One. In addition to that, there are two hidden screws under the back rubber feet.
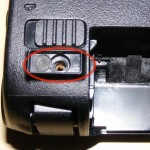
You will need to peel off the back rubber feet to get to those screws. I used pliers to slowly peel up the rubber feet. Try to not touch the sticky side so that they can be reapplied after. When done, they reapply rather easily. The 3 screws from the back and front are different sizes to be sure to organize them correctly. |
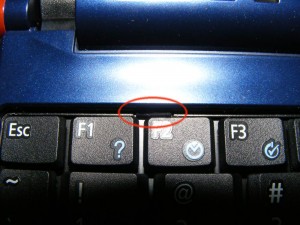 Step 2 – Lift up keyboard Step 2 – Lift up keyboard
Flip the Aspire One over so the keyboard is facing up. There are three clips holding the keyboard down by the F2, F8, and Pause keys. You need to push these clips back and down with a credit card so they are no longer visible. After doing this, the clips may pop back up and need to be redone. Once they are all back, you can slide the credit card under the keyboard to pry it up. Do not put the credit card under the keys but under the keyboard. You can then slide the credit card around the sides prying the entire keyboard up. |
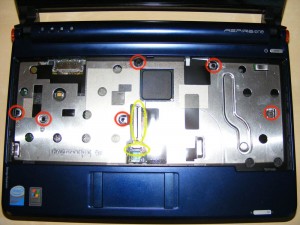 Step 3 – Unplug keyboard and remove more screws Step 3 – Unplug keyboard and remove more screws
Lean the keyboard forward to expose where it is plugged in towards the center. This cable is held down with a clamp that is on top of it. You can flip this up to release the connector. The keyboard should now be loose and can be put aside. Right below the keyboard connection is a smaller similar connector for the trackpad. In the same manner, flip up the clamp which will release the trackpad cable. |
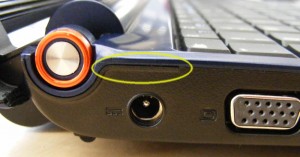 Step 4 – Remove top panel surrounding keyboard Step 4 – Remove top panel surrounding keyboard
Towards the back left above the AC plug is the best place to start prying open this panel. Push the credit card between the panel and the base to begin prying it open. Then slide the card completely around the panel which will free it so it can be removed. |
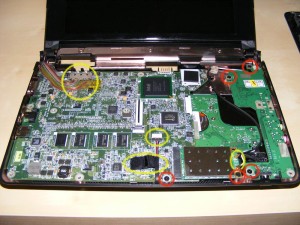 Step 5 – Unplug, unscrew, and remove motherboard Step 5 – Unplug, unscrew, and remove motherboard
The video cable is towards the upper left. It is held down with tape so first pull up the tape and then pull out the connector. Towards the bottom middle is another cable held down with black tape. Lift up the black tape and then slide out the connector leaving the cable dangling. Towards the bottom right is the Wi-Fi card. To the right of the card are 2 cables plugged into it. Unplug these by pulling them directly up then leave them dangling. The Wi-Fi card is held in with one screw. Unscrew it and the card will be easy to remove so you can set it aside. There is a main board to the left and a daughter board to the right. The main board has just one screw towards the bottom and the daughter board has three screws. All of these screws need to be removed. |
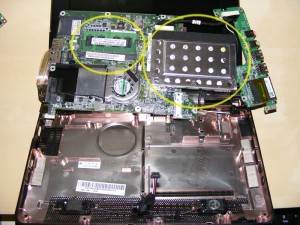 Step 6 – Replace RAM and/or Hard Drive Step 6 – Replace RAM and/or Hard Drive
You can now flip up the boards to expose the underside where the RAM and hard drive are. The RAM is on the left and is held down in the typical way with prongs on the sides. Remove the 512MB card and insert your 1GB card. It is in properly if the prongs fit into the notches on the card. The hard drive is to the right and can be separately unscrewed to replace. |
| Step 7 – Put it all back together
By this point, hopefully you’ve kept all the components and screws well organized because you just have to do everything in reverse. When putting the boards down, be sure you have everything flush and tightened so there is enough room for the keyboard to go back in on top of it. Don’t forget to plug all connectors back in so review the above steps to be sure you do. The panel around the keyboard will snap in as will the keyboard itself by applying a little pressure. Before screwing in the bottom screws, you might want to boot up to make sure everything is working. |

comes with 1GB of RAM and a 160GB SATA Hard Drive. For an idea of its performance, please check out this video. RAM can be upgraded to 1.5GB by replacing a 512MB stick with 1GB. We recommend the Kingston PC2 4200 1GB Laptop Memory
. The hard drive can be upgraded with another 2.5 inch SATA hard drive such as the Western Digital 320GB 5400 RPM Scorpio
.
to put the new drive in to copy to. If you are unfamiliar with this, it is a very similar process to duplicating the drive in a Tivo.


I bought my Acer Aspire One Sep28,2008, Windows XP version, 120GB HD and 1GB RAM.
Based on this site and reviewing upgrades on youtube clips (which are very useful) I did upgrade hard drive to 320GB and
1GB DDR2 in the same time, since the dissassembly is quite difficult. Before that I made research on Internet to make 100%
sure the parts are compatable and will work on Acer One motherboard. The HD I used is 2.5″ SATA HD 320GB WD3200BEVT 5400RPM 8MB Cache and the memory 1GB DDR2 PC2-4200 200pin SoDIMM Non-ECC 533MHz Unbuffered Memory KVR533D2S4/1G. Had to buy also external CD/DVD writer, so I could use ‘Acronis True Image 10’ CD to clone the original HD to the new one, via USB HD enclosure. Used also antistatic tray and band on hand, since found on Internet some units not working after upgrade, even when original hardware was put back. Everything went smoothly as I expected, and working flawlessly since the upgrade. My BIOS is version 0.3114 and do not have problem with noisy fan as reported in some comments. I can hear the fan is
running, thats all. All other my computers are NOISY in comparsion with Acer One.
I am so far happy with the Acer Aspire One and because the size and weight I take it to places (including my work) where I would never took it. I have laptop Acer Aspire 5570 4315 (14.1″) and it is only sitting home on my desk.
thanks for providing the exact memory and drive you used succesfully
My Aspire One came with a Samsung 512MB PC2-5300 667MHz stick of RAM
and I replaced it with a 1GB Kingston module of the same spec with no ill effects!
Great guide. I have still not decided if I dare to attempt a ram upgrade or not…
Can the Acer One take a 2gb memory upgrade. I am looking to do this….
I had bought the Aspire One with the 120GB and 1GB ram, I am not as much looking into upgrading the ram as I am the hard drive. So I was wondering if the 5400 rpm is the only speed that will work or could I go ahead and get one with 7200 rpm, or it wouldnt make much difference?
Well if you really want to upgrade the harddrive with a faster speed and space you’re also looking at deteriorating your battery life.
@Daniel – I have just done the HD upgrade from the 120GB 5400 spin Hitachi unit that it came with to a Seagate 320GB 7200 spin unit. Unfortunately changed OS so cant tell if it has made any significant difference. Boot time is the same as a Lenovo T61 (2.2G) with a 5400 spin drive.
The Seagate drive is a little noisier and the laptop seems to take a second or two longer to come out of suspend as the drive spins up. Unless you need more capacity probably not a worthwhile upgrade.
Thanks for this information. It was invaluable to my upgrade!
Yup, the instructions are accurate and helpful when installing RAM and not really that painfull. I now have a 512 MB stick of RAM for sale. As for the HD upgrade I am not sure if upgrading from the 160 GB WD1600BEVT that came standard on the 150 model is a needed upgrade as it’s performance is a 2.2 on Windows 7 RC
Thanks for this article, 🙂 Jake
Yesterday I upgraded my Aspire One, using your very helpful tutorial! I intended to upgrade just the HD, which I did with a WD 500Gb WD5000BEVT 5400rpm. But since the laptop was already open and the memory costs just about nothing, I also replaced the 512Mb with a 1Gb Corsair VS1GSDS667D2. I bought the 667Mhz version, because the 533Mhz was sold out, but it works perfectly.
Originaly I had a 1Gb, 120Gb Aspire One, not a 160Gb version. Apparently they sell them in different configurations…
Thanks!
I read several of these and seen a few on youtube, this is by far the best. I struggled getting the keyboard ribbon out until I saw this site; I had no idea that you had to lift the tab to get it up. I might have pulled it out otherwise. By all means, use a credit card not a screwdriver to pop the keyboard tabs, a screwdriver marks up the plastic pretty bad. And remember, be gentle!!!
You Wrote:
“If you are upgrading the hard drive, you will be losing all the data on the included drive.”
Can’t you take that HD put it in a external casing a get at the data? I am trying to get some files of a dead computer.
my installation is corrupt (XP) i want to get data on my desktop prior to to attempting to fix it or re-installing.
My Aspire one has performed slowly from the day I got it. Firefox takes at least 10-15 seconds to open. Menus also take some time to open. I have 1gb ram and the 160 gb hdd. I just received a 1gb stick in the mail today. Do you think upgrading the hard drive may solve these issues? I even have software used to optimize system performance, I delete internet cache often, and my machine is still sluggish.
Sure, you can use the drive either in an external case or just with an external SATA to USB connector.
The hard drive upgrade should not cause a significant improvement in speed, unless you have completely filled the drive you are currently using. If it takes 10-15 seconds to start Firefox, there may be something else wrong with your computer. Or perhaps your “software to optimize system performance” is crap. I don’t think deleting internet cache would have any impact.
As Rick states, upgrading the hard drive won’t give you a significant performance improvement, unless, you go to a faster hard drive. I stopped at CompUSA yesterday. I was going to get a 320GB drive (Seagate). Like my stock 160GB model, it was a 5400RPM drive with 8MB cache. As I was looking, I happened to notice that the 250GB drive right next to it spins at 7200RPM and has a 16MB cache. As my original drive was nowhere near full, I figured that the performance boost from the faster drive would outweigh the lesser capacity. The faster drive was also $10 cheaper! As for memory, I’m using the 1GB stick that I pulled out of my Asus Eee 900 (16GB) when I upped it to 2GB of RAM. It’s made by ASint and performed well enough in my Eee.
I just wanted to note that the upgrade went fabulously thanks to your very clear instructions. I’m now running 1.5GB of RAM and a 250GB HDD running at 7200RPM with a 16MB cache. Early tests show a significant speed increase, especially when I’m booted into my Ubuntu Jaunty partition. Speaking of partitions, I used Acronis True Image Home 2009 to clone the original drive to the new. I *highly* recommend this product (and no, I do not work for them). It cloned not only my Standard Aspire One partitions (the NTFS Win XP and the FAT32 restore), but also picked up my Ext3 and Linux swap partitions as well. Once I installed the drive, I was able to boot into each OS without a glitch!
Thank you so much for such detailed instructions! My hard drive failed and I hadn’t backed up in about 5 months, so I wanted to take it out and back it up to my external hard drive. I got all my data backed up and was able to use the Recovery Management Tool to get back up & working. Thank you again for making it so easy to understand!
Using this Manual today i’ve upgraded to 1,5GB Ram, i’ve used a Guitar Plek to get of the Keyboard and to Flip the Plastic Tabs. The Memory Module Used was Build Out of a Upgraded EEE-PC that i got from ebay for 4 Euro. The Type is DDR2-667 (PC2-5300). Next i’ll change the WLAN Card either for a Combo WLAN/Bluetooth ot a Dell Truemobile 1490, that is reconized by Mac OSX and Probably the HDD.
Does anyone know if I could swap out the slow SSD (Intel Z-P230) with a regular SATA HDD? They should be essentially the same size, right?
Re: David
They should be essentially the same size, right?
Not on the SSD models,but YES on the HD model Acers
There’s just enough space for a thin (5 mm) 1.8″ hard drive
Regular SATA HDD = 2.5″
Thanks Sucat!
I did some research and I think I’ll have to purchase the Super Talent 1.8″ ZIF SSD instead.
When I turned on the netbook today, it stopped because it said that there was no HD present. What should I do? If I have to replace the HD, can I download the preloaded software from Acer?
Anybody else find the wireless on the Aspire One very slow. Eg YouTube only run 3 or 4 seconds before it needs to stop and buffer. Runs fine on wired. Also, average ping on wired is <1 ms as expected. On wireless average is app 50 ms even sitting next to the AP. Chipset is Atheros AR5007EG.
Thanks a lot 🙂 This was very helpfull. My Aspire one stopped working because of some known Bios problems after 10 months usage. The resellers had to send back hundreds for repair. I decided to remove my harddisk before sending the Aspire to service. Have a lot of important documents/inquiries, and emails i don’t want anyone to see.
Thanks 🙂
I opened up the entire laptop to upgrade the ram as per the instructions give. Now I can’t seem to fix the keyboard connector properly. The wire from the keyboard keeps slipping out. The laptop boots up fine but some keys don’t work. Anyone know how to fix the keyboard wire properly? It would be a great help.
Yes, I have 3 acer ones and the wireless is definitely slower than on my toshiba satellite laptop.
” RAM can be upgraded to 1.5GB by replacing a 512MB stick with 1GB. ”
So, how exactly do you replace the 512MB stick with the 1GB stick and come up with 1.5GB? I’ve been looking all over. I’m pretty sure that if I did pull out the 512MB stick, the remaining ram would be 1GB, not 1.5GB.. unless I’m missing something entirely.
@Mohamed – There is a tiny switch where you flip down onto the cables after you put them inside the hole. Pushing it down will fasten it securely. If that does not work, then the cables have been ****ed up.
There is 512MB onboard. So instead of 512MB + 512MB, you end up with 512MB + 1GB.
I followed the instructions here and upgraded my Acer from 512MBytes Ram to 1.5GBytes and installed a new 320GByte HDD repacing the orginal 120GByte one. The components I used were: Kingston – Memory – 1 GB – SO DIMM 200-pin – DDR II – 667 MHz / PC2-5300 – unbuffered; and Western Digital Scorpio Blue 320GB SATA 8MB Cache 2.5 inch Internal Hard Drive OEM. I purchased both items from Amazon, UK. I used a free utility called PING (Ping Is Not Ghost) to make an image of the original drive (XP) (prior to the upgrade) to an external USB drive and restored the image to the new drive; it worked well. I booted PING from an external USB CD-ROM Drive. *** The really important step in the upgrade is the keyboard connector and the mouse pad connector. It is very important that you lift the black plastic tabs carefully upwards to enable the cables to be withdrawn freely and easily *** I had to remove the keyboard again to get the mouse pad working as I had not paid enough attention to this step. I would recommend the instructions here; you need about one hour; good eye sight and to be methodical and tidy. Good luck.
These Acer netbooks are very easy to work on, yes there are a few screws but anyone with any sense can strip one down and change the memory and the HDD, in fact if you want difficult try stripping a motherboard out of a Dell C600 laptop, thats a nightmare.
Oh and if you accidentally find yourself with a black screen and power then you have stuffed the BIOS up, i did it and so did a friend however do a google on Acer one black screen and follow the guide on how to reflash your BIOS, it takes about 5 minutes once you have the files and fixes it first time with no loss of data.
Great guide, good pics. Thanks for the info! This guide is very comprehensive!
Just opened up my AAO AOA-150 to replace the dead hard drive and upgrade the RAM. Following the guide it was a breeze. Keep track of your screws, be careful with the video cable, and take extra care with the keyboard and trackpad cables. A couple of my # keys (7 & 9) are a bit finnicky, and I suspect that the cable didn’t get seated properly. Other than that, everything works just fine.
Thanks again to Robert for taking the time to make this.
Cheers.
Can someone provide a link (besides to Amazon) for the correct 1 gig memory card? I can’t seem to find it except for on Amazon, and I’ve always felt they overcharge rather harshly.
Hey Chris how did your HD die? My brother has an Acer one that I have had apart and suspect that the HD is the culprit because it gives an unable to load OS message and when I run the windows XP install disk it goes to the format and reinstall but never gets anywhere with the formatting it just sits at 0%, I am in the process of getting a new HD and replacing the HD and Upgrading the ram in his system but would really like to know if his HD really died, or it just became corrupt. Email your reply to Iceman9mm@aol.com thanks.
MASSIVE KUDOS to the author of this article. When my HDD died I was afraid I’d have to either abandon my Aspire, or else take it to a shop and pay to have an HDD put in it. However, following these directions, it was relatively easy to replace the HDD myself.
Thanks!!
John
Very thanks of venezuela, my notebook was die for the bios and now i reset bios and hi’s alive! thanks
acer aspire one running linux i just want to put windows xp on it.could anyone tel me how to do this.
Does anyone know if a HARD DRIVE can be added to the Acer Aspire ONE that came with the 8GB solid-state drive?
Fantastic guide, thank you. I was able to take out the HD from a non-booting aspire and attach it to another machine to get the data off. Windows reported that the disk was damaged and a simple windows disk check fixed it! The aspire now boots and runs properly without any further repairs. Lucky…
brilliant guide. thank you very much x
So could i just buy an external hard drive that is usb 2.0 and clone my drive over to that, then open it up and put it inside the acer?
Used this to remove my hard drive after my model died so I could retrieve my information….great instructions even for a total amateur like myself. Thanks a lot.
I’m having problem popping the clips in step 2 back when I put things back together. The clips seem to disappear and I can’t reach them with my credit card anymore.
Any help would be appreciated. Thanks!
The tutorial is nice, had a good feeling that I could successfully replace the 8GB SSD and Ubuntu with an 80GB SATA HD and XP Home for a client. However, my reading of the tutorial did not make it clear that this was only for HD equipped models, not SSDs. In the model I worked on (a ZG5 if I remember the sticker buried in the guts of this), there is no SATA connection at all. I’m probably going to to throw XP Home at it anyway and see if my client is willing to buy an external drive enclosure. At least I know that I never want to work on one of these again.
This guide was incredibly helpful when my HD crashed and I needed to replace it. However, I am experiencing the same issue as askpoon…. the clips that normally hold the keyboard in place cannot be extracted. Any tips to get them back in place and holding the keyboard where it should stay?
Here is a tip. I work on lots of laptops and I keep a magnet handy. When I remove a screw I put it on the magnet. I never have a problem with lost screws.
i have no idea what is going on with my HDD. i took it out thanks to this tutorial and plugged it into my other computer using an external HD enclosure and it wont recognize it at all. this hard drive is a replacement and only 3 months old. anyone know what is wrong?
Thanks. This was EXACTLY what I needed to remove the HD. No CD-Rom, I wanted; no. I needed to swap vista back to XP!
i have a backup ghost copy of the XP home HDD from an acer one, so if anyone has had their drive turn up its toes and die, i can image a new drive for you..including the restore partition.
for info mail me at judslat at sky dot com