Make your Internet faster by changing DNS

namebenchWhen you go to any website, the browser first has to lookup where that site is located.  This is done by connecting to a domain name server (DNS).  There are many DNS options, not just the default of the ISP. Often other options are much faster.  Most websites actually load content from various domains at once so each DNS request adds up in how fast your internet experience feels.

A great open-source DNS benchmark utility is namebench.  It will test your current DNS against other global DNS or nearby providers.  Versions for Windows, Mac, and Linux are available for download.

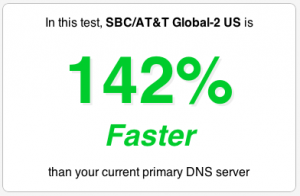
A recent customer had OpenDNS setup but it turned out the nearby AT&T DNS was 142% faster.  Most people probably won’t get quite that huge of a gain.  Depending on your location and ISP, its hard to predict what your best DNS option is which is why the namebench utility is so valuable.

Once you’ve figured out your best DNS options, it is best to setup the DNS in your router through its administration page.  You could change the DNS in your computer’s network settings, but then none of the other computers on the network would see that gain in internet performance.

Harmony Remote Favorite Channel Icon Image

Harmony One Favorite Channel IconsIf you’ve got a recent harmony remote such as the Harmony One and have hard to remember 3 or 4 digit TV channels, setting up favorites can be very useful.  Then you just have to select the channel on the remote and the right numbers are sent.  To make things even prettier, you can define icons for each channel.

A great place to download icons is iconharmony.com.  The interface is a little strange but you can search for each channel icon image you want and select it.  Once you have selected each image you want, you can download them all in one zip file.  You use the logitech harmony remote software to define your favorite channels and browse files to assign the icons.

Old Kindle and Kindle 2 users get no improved battery life

Kindle Battery Update.. Not For Most PeopleKindle 2

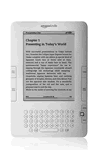
It has been widely reported that the recent Kindle firmware update improved battery life up to 85%. Unfortunately, this is not true for almost all Kindle owners.  The battery life improvement only applies to the recent Kindle 2 (Global Wireless) version that was introduced October 7, 2009.  The original Kindle and Kindle 2 (U.S. Wireless) version see no such benefit. Amazon points this out in a roundabout way on their site.

The Kindle 2 (U.S. Wireless) version does get the other benefits like built-in PDF reader and manual screen rotation.

Aluminum iMac Hard Drive Upgrade

What you need

1. T6 and T8 torx screwdrivers
2. Phillips Head screwdriver
3. Microfiber cleaning cloth
4. Suction cups
5. External USB or firewire backup hard drive
6. New SATA hard drive. We recommend the 1.5TB Western Digital Green Drive

Step 1 – Backup via Time Machine

Before you start, you have to first make sure you have a recent time machine backup.  After installing the new drive, we will restore from this backup.

imac ram slot

Step 2 – Remove RAM slot

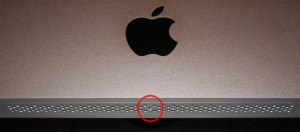
The RAM slot is held on with just 1 screw.  Unscrew it and pop off the panel.  The screw does not fall out but remains in the panel itself.  If you are upgrading RAM, this all all you need to do.

imac-hdd-02

Step 3 – Remove the glass screen

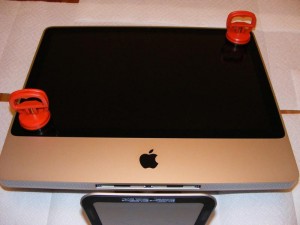
This may seem like a scary step but it is extremely easy.  Firmly attach suction cups at opposite corners.  Then gently lift up.  The glass is held on with magnets and comes off with very little effort.  I recommend laying out a towel or paper towels to lay the glass on.  Be careful not to scratch the glass or screen beneath it.  If at all possible, try to do this work in a non dusty area because we will later need to clean off the dust between the glass and LCD screen.

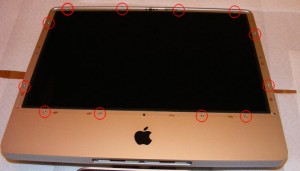
imac-hdd-03Step 4 – Remove front aluminum casing

There are 12 screws around the edges holding on the front aluminum casing.  Unscrew them all keeping track of which ones go where since they are varying lengths.  You can then lift upwards around the edges to take off the front casing.  Flip it towards the top of the imac and lay it on the table above it so that you do not have to unhook the camera.

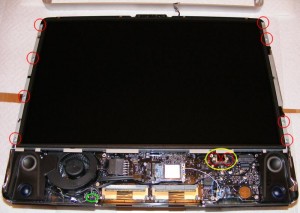
imac-hdd-04Step 5 – Remove LCD panel

The LCD is held down with 8 screws on the sides which need to be removed.  There is a cable marked in green toward the bottom which needs to be unhooked.  There is also a connector to the right marked in yellow that is held down with 2 screws.  Remove the screws and pull the connector upwards to unhook it.  You should then lift up the LCD gently where you will see 2 power connectors toward the upper right that need unplugging.  The LCD should then be free to place elsewhere.  The hard drive will now be visible.

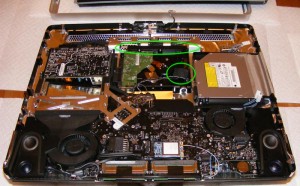
imac-hdd-05Step 6 – Remove the old hard drive

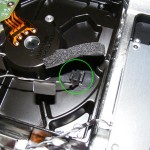
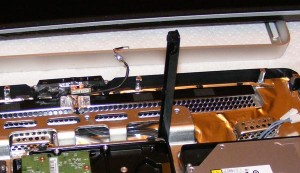
There is a cushion glued on top of the heat sensor cable.  Gently pull up this cushion keeping it in one piece and try to maintain its stickiness for later.  The heat sensor is held in place in a plastic notch and can slide out of it.

imac-hdd-06

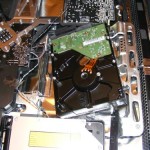
imac-hdd-07There is a black plastic bar holding the hard drive in place.  Lift it up from left to right to unlock it.  This can be very challenging since it is tight.  The drive can then slide up and out and you can unhook the power and SATA cables.

imac-hdd-08

Step 7 – Add the new hard drive

There are 4 screws on the old hard drive which need to be removed and added to the new hard drive so that it can slide into the holders on the iMac.  Once the power and SATA cables are plugged back in, you can slide it back in and lower the black plastic bar to lock it in place.  Place the heat sensor on the drive in about the same area where it was and use the sticky cushion to hold it in place.  If it doesn’t seem sticky enough to hold, you can get some rubber cement from your local home depot and add just a bit to hold it in place.

Step 8 – Put the system back together

Rebuilding the system is mostly straightforward.  It can be handy to have an extra pair of hands to hold the LCD as you reconnect the power cables.  We recommend you lay out the screws in an orderly manner so that you know exactly which one goes where as you rebuild.

Once the system is rebuilt except for the glass, you want to use the microfiber cloth to remove any dust or debris on the front of the LCD screen and back of the glass.  You will also need to use the microfiber cloth to clean the front of the glass once you remove the suction cups.

imac-hdd-10Step 9 – Restore from Time Machine backup

When you first boot up, insert the Mac OS X install disc and hold down the option key while booting so you can select the disc to boot from.

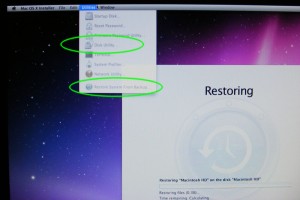
Step through the install until the Utilities menu appears at the top of the screen.  First use Disk Utility to erase the disk and create a volume.  Then choose to restore from backup from the same menu and choose your external time machine backup.  Your system will then be just as it was except with a new hard drive.

Snow Leopard Review

Snow Leopard

Snow LeopardThe latest version of Mac OS X is out, already with a system update available.  It costs $29 but you can find it cheaper at places like amazon.com.  Overall it is probably worth getting for most users but it is not without its troubles.

The Good

The behind-the-scenes components have been optimized to be far more efficient.  For apps that are designed to take advantage of the new OS, they are significantly faster.  For now, that mainly means Apple applications like Mail or Safari.  Boot time and resume time are also much faster.

There is a new dock expose feature where you can hold down on an app icon in the dock to see all of its windows only in expose.  This can be handy if you have a lot of open windows and only want to see those of a particular program.  This is one of the very few new features since this OS is mainly just background improvements.

Several of the OS enhancements are not being taken advantage of yet by third party application providers.  Once snow leopard versions of programs come out, the benefits will become far more prominent.  The new OpenCL feature is particularly interesting.  Typically your powerful graphics card is not doing very much.  OpenCL allows programs to perform calculations that would normally be done on the CPU to also be done on the video card.  For many tasks, this could result in massive speed improvements.  Only time will tell how many developers take advantage of this but it seems likely for the big developers like Adobe to do so.

The Bad

Besides Apple apps, most programs don’t seem much faster.  In fact, some seem a tad slower, probably in need of a snow leopard built version.  In the worst case, there are some applications that don’t run in snow leopard at all.  Some of the more notable ones are older versions of Photoshop or Parallels.

Since installing snow leopard, I’ve seen an odd behavior every few days where the transparent menu bar becomes opaque white and the system becomes quite sluggish for no apparent reason with no programs using up a lot of resources.  Only a reboot resolves things.  This is very un-Mac behavior.  This is an upgraded system that has been migrated from other Macs a few times so it is possible it just needs a fresh install of the OS from scratch but that just makes me feel like I’m using Windows again.  I’ve only seen this on one system, a current model Mac Pro.

Perhaps the worst thing about Snow Leopard is just that it isn’t a major change and there isn’t much obvious benefit besides some current performance improvements while waiting for programs to further take advantage.

Conclusion

Snow Leopard will probably be pretty sweet once there are more programs built to fully use it.  In the mean time, I do enjoy the fastest browser I’ve ever used and having my email pop up instantly.  You definitely can’t argue with the $29 price.  However, there’s really no rush for most users to upgrade.  Waiting a few months is probably more than fine so you can give developers time to make necessary changes.