Adding iTunes Next Track Keyboard Shortcut for Logitech Easy-Switch Bluetooth Keyboard

The new Logitech Easy-Switch Keyboard for the Mac is an awesome keyboard.  It has a big advantage of 3 keys that quickly connect to 3 different Mac or iOS devices.  You can put your Mac on button 1, iPad on button 2 and iPhone on button 3.  Just one press and you’re ready to type on the device.  Unfortunately, to have these 3 buttons, the iTunes next track and previous track buttons aren’t there like on Apple keyboards.  I use those all the time and its just not the same having to take your hands off the keyboard and mouse over to iTunes to click next.  Fortunately, the Mac has the ability to define new keyboard shortcuts.

Step 1 – Create a new Service for iTunes Next Track via automator

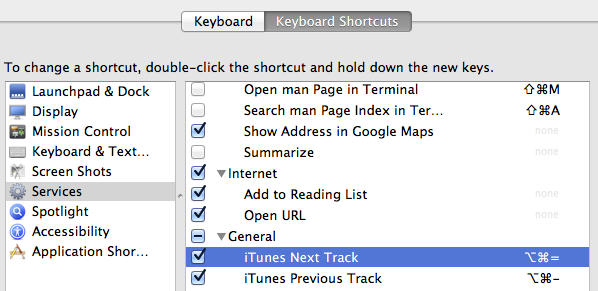
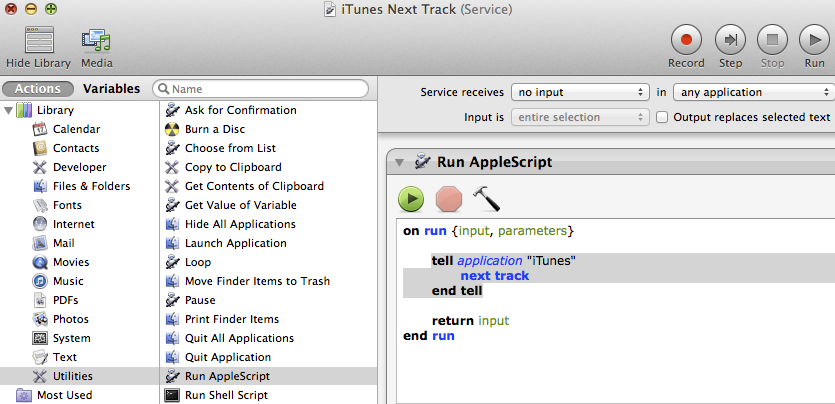
Launch the Automator app and create a new Service.  In that service, Run AppleScript and select no input for what the service receives.  The AppleScript tells iTunes to go to the next track.  Save the service as iTunes Next Track.  You can create a new service and do the same for iTunes Previous Track.  It is exactly the same process except change the AppleScript “next track” to “previous track”.

Step 2 – Define the Keyboard Shortcut

Your new Services should appear under Keyboard Shortcuts in System Preferences.  They are at the bottom of the Services list.  Here you can select the shortcut and then enter the keyboard shortcut you want to use.  In my case, I chose to use “option command =” because the = key also has a + on it so + to go next track and – to go previous track.  You must choose this shortcut wisely or it may not work.  If an app that has focus has the same shortcut, it will overrule this one so you need to choose something that doesn’t seem present in the apps you are using.  That’s part of why I had to use “option command” because just one of those with = is already in use in some programs I use.

Fortunately, the play/pause and volume buttons are still there so those don’t need to be re-created on the Logitech Easy-Switch Keyboard.  Even though I now have to hit 3 keys at once instead of just the next button, the Logitech Easy-Switch Keyboard is the best wireless keyboard for the Mac.



Rejuvenate Original iPhone with Whited00r

No Apps

The original iPhone can only be updated to run version 3.1.3 of iOS. This means that the vast majority of apps in the iTunes App Store can not be loaded onto the original iPhone. It would be nice if Apple allowed developers to keep old versions in the App Store for people with old devices. But since they don’t, it’s great that you can jailbreak the phone to allow many apps to run.

Jailbreak Steps

I followed these instructions from iPhoneBlogr. This not only jailbroke the phone. It also unlocked the phone so that it could be used on non-AT&T carriers, especially useful if I want to use the phone when traveling abroad.

Then I restored the phone in iTunes using Whited00r 5.1.

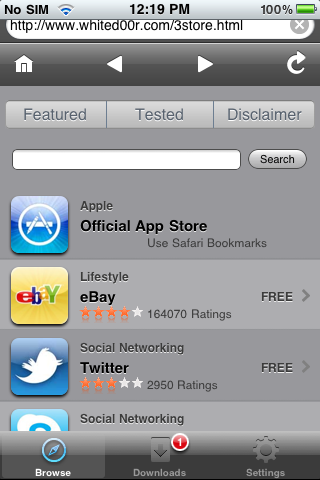
Whited00r gives you a new app store with a links to older working versions of Skype, Twitter, Facebook, etc.

Conclusion

Performing the jailbreak can be a little scary for some people. But if you have your iPhone 2G or original iPod Touch in the closet or ready to go in the trash, give this a try. They are still good devices if you make the Whited00r updates.

iTunes Match

Benefits

iTunes Match accomplishes a few things for me:

  1. Updates my collection to 256 kbps aac files (higher quality)
  2. Backs up my collection online (iCloud)
  3. Makes it easier to use other Apple products for my music collection without needing to download everything. This makes it easier to use a lower capacity laptop, iPhone, or iPad.

It’s worked pretty seamlessly for me and costs $25/year, although you only need one year if you just are interested in accomplishing #1 above.

Updating to 256 kbps

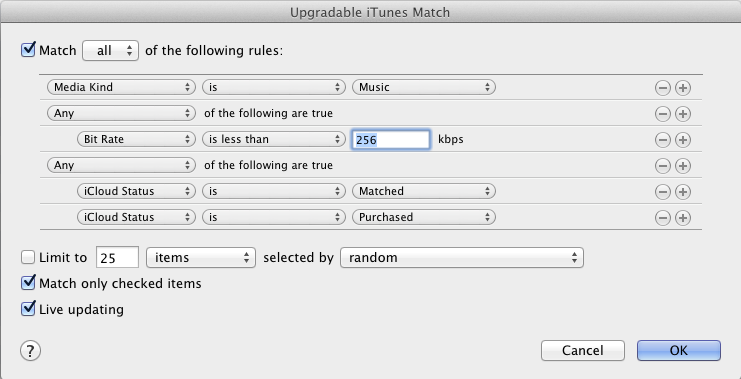
I followed the Macworld instructions to create a Smart Playlist that shows just the songs needing an upgrade (see picture). Hold down option key when clicking the plus to add the conditional rule for iCloud Matched or Purchased.

Then I selected all the files and deleted them, making sure to NOT select to delete them from iCloud. Then I downloaded the files over a couple of days.

iTunes Scripts for Mac

iTunes has some quirks. One is that if you add artwork using its Get Album Artwork function, the images are not embedded in the music files but are kept elsewhere in the iTunes database. This is normally fine. But if you want to send someone an mp3 you have, the artwork won’t travel with it. So I was looking for software to fix this and came upon the resource of Doug’s AppleScripts for iTunes (for Mac only).

Doug has software and scripts to help you with many common issues such as dealing with duplicate files and multiple iTunes libraries.

My problem was solved with the script Embed Artwork. Once you install the files, you get a script option in the iTunes menu as shown here, allowing you to embed the artwork into the MP3 file so that it is portable. This also helps people who want to use iTunes and other non-Apple media players such as Android devices.

Move iTunes from PC to Mac

As of iTunes 9, it is pretty simple to move the iTunes library from one computer to another, even between Windows and Macs. These instructions detail a move from a PC to a Mac.

  1. Update to latest version of iTunes on both systems. In Windows: open iTunes, then Help -> Check For Updates. On Mac: open System Preferences then Software Update.
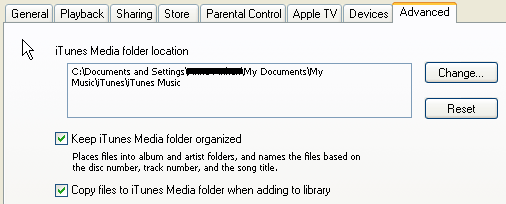
  2. In Windows: open iTunes’ preferences (Edit -> Preferences) and click the Advanced tab. Check both Keep iTunes Media folder organized and Copy files to iTunes Media folder when adding to library. These settings keep all your media files in the main iTunes Media folder, which you will later copy to your Mac.iTunes Advanced Organized
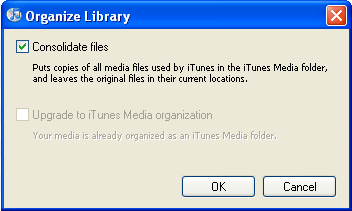
  3. In Windows iTunes: Choose File -> Library -> Organize Library. Check Consolidate Files, then click OK. This moves any files that weren’t in the right folder and makes sure that the library file has the correct pointers to these files’ locations. If the Upgrade To iTunes Media Organization option is not dimmed, check this too; it sorts your files in separate sub-folders.iTunes Consolidate Files
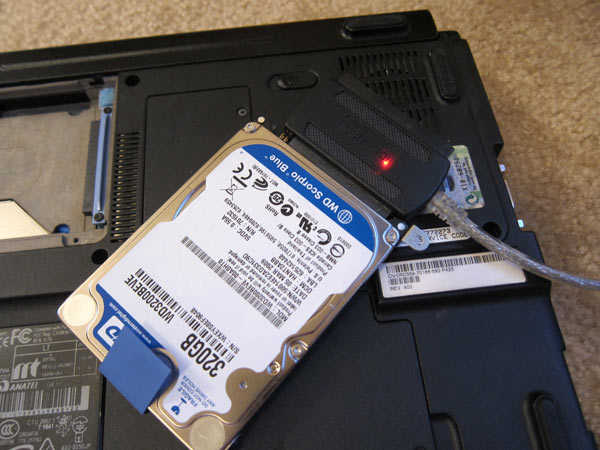
  4. Copy the iTunes folder (in Windows 7 located in username\My Music\iTunes, in Windows XP located in Documents and Settings\username\My Documents\My Music\iTunes). You can copy by sharing the folder over the network, copying the folder to an external drive, or by pulling the Windows computer’s hard drive and attaching it to the Mac by a USB adapter (see picture). Pulling the drive is usually the fastest method if you have a huge library. Copy the iTunes folder to the Music folder in your user folder on the Mac. If there is already an iTunes folder, it means you’ve launched iTunes at least once on the Mac. If there’s no music there, you can just replace the folder. However, if you’ve already added music, you won’t be able to merge the libraries; in the iTunes Media folder, found in the iTunes folder, move the Music folder to your desktop and add those files into iTunes after you’ve completed this process. (Note that you’ll lose any playlists and play counts associated with those files. Alternatively, you can add the music from the PC to Mac’s iTunes by dragging it into iTunes, thereby losing the playlists etc of the PC’s music.)USB IDE Hard Drive Adapter