Update to Paperless Office Post for OS X Mavericks

One of our most popular posts is Paperless Office in a Snap explaining how to set up automatic OCR of scanned documents.

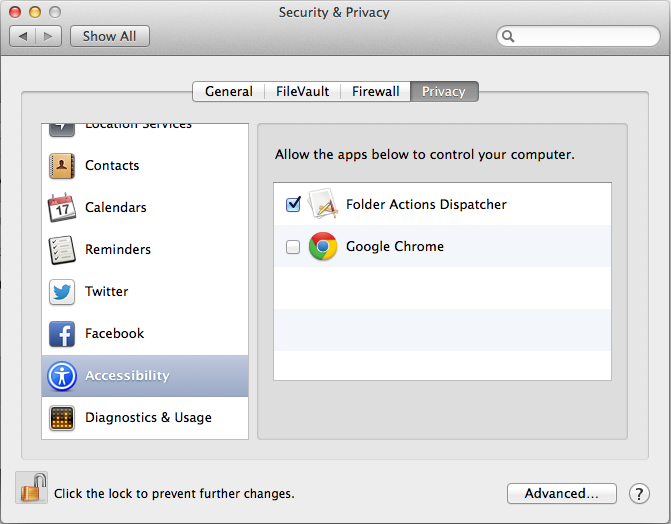
With the release of Mac OS X Mavericks, the controls for Accessibility features have changed. Therefore Step 5 in the Paperless Office in a Snap post has changed. Instead of clicking Enable access for assistive devices under System Preferences – Universal Access, you now need to do the following:

Go to System Preferences – Security & Privacy – Privacy – Accessibility.

Click the checkbox to allow Folder Actions Dispatcher to control your computer as shown below.

ADDITIONAL UPDATE: This option might not show up for you until you go through the other steps in the original script and it fails. Then come back here and the checkbox option below should be available.

Security Privacy Accessibility

WiFi Scanner for Mac

There’s a decent WiFi scanning tool built into Mac OS X Mountain Lion. This can be helpful when trying to diagnose interference issues based on channels and signal strength. It’s a bit tricky to find. Go to your hard drive, then the following folders:
System – Library – CoreServices

Then click on the app “WiFi Diagnostics”. Then a window pops up to help you create a diagnostic report. I ignore that and just click on the top menu:
View – WiFi Scan

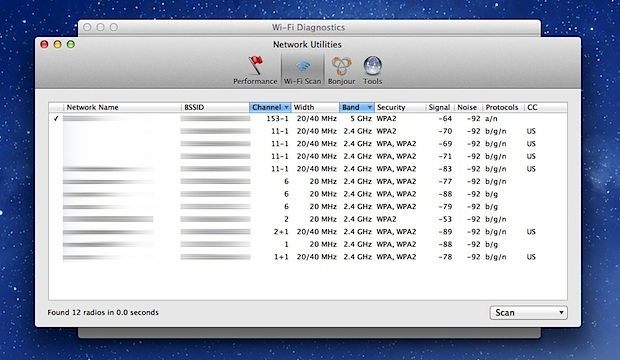
Then you’ll see this handy program:

Wi-Fi Scanner Mountain Lion

If you use this program a lot, you can drag it to the desktop or your Applications or Utilities folder.

First Real Malware for Mac

Flashback

Flashback is the first malware (malicious software or virus) for the Mac that people should worry about. It can infect computers through a vulnerability in Java. It’s estimated that 600,000 Macs have been infected, about 1% of Macs in use. Flashback collects personal information such as bank and login information. To see if your Mac is already infected, follow the instructions from Macworld.

Unlike with Windows PCs, this phenomena is new to Macs. The closest previous infection I remember was when a torrent version of Apple iWork ’09 contained a trojan. But that just impacted people who downloaded the pirated torrent. Flashback is far worse since someone can get it by just visiting a website.

Protection

It’s easy to protect yourself against malware and viruses on a Mac. There is no need to buy anti-virus software which doesn’t really help much on a Mac. Instead, take these steps that deal with the exploits of Java and Flash.

1. Perform Software Update

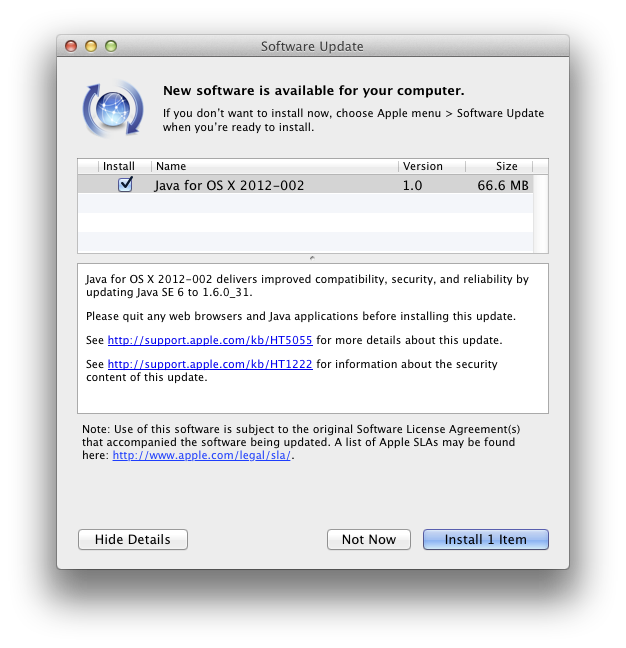
Apple’s updates automatically patch Java and remove Flashback. Open System Preferences and go to Software Update, Check Now.
2. Disable Java in any web browser you use

Safari
Go to the menu item:
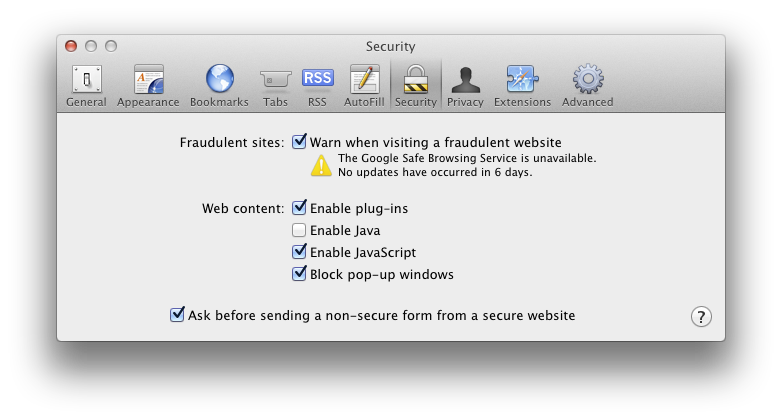
Preferences -> Security -> Web Content
Uncheck Enable Java
Chrome
Go to the URL:
chrome://plugins/
Click Disable for Java

Firefox
Go to the menu item:
Tools -> Add-ons
Click on Plugins and click Disable for the Java Applet Plug-in

3. Install a Flash Blocker

My favorite is ClickToFlash, the Safari Extension which gives you access to Flash content if you click on the Flash window. This has the additional benefit of hiding annoying Flash ads.

Another tool I use is FlashFrozen, available for $0.99 through the Mac App Store. This handles all Flash running on your computer. It is especially useful for Mac laptops which can have their batteries quickly run down by errant Flash sites.


UPDATE: Oracle (the owners of Java) have released their own Java updates now. If you have Java installed on your system, you should get the latest Java SE Development Kit from here:
http://www.oracle.com/technetwork/java/javase/downloads/jdk-7u4-downloads-1591156.html
After installing, go to Utilities – Java Preference. From there, drag the latest Java to the top. As of this writing, that is Java SE 7. Uncheck the older Java versions. The next time you start a program that uses Java, it will now use the newer Oracle Java that has the latest security patches.

Mac Eject Key for External Disk Drive

Apple keyboards have an eject key in the upper right corner that works with built-in Mac DVD drives. If you have a new Mac Mini without an optical drive, you might want to use a 3th party external disk drive. The problem is that the eject key doesn’t work for these drives.

Thanks to tjb1 at MacRumors who gave instructions on how to make the eject key work.

  1. Download and install KeyRemap4Macbook. Restart is required for use.
  2. Open System Preferences > KeyRepma4Macbook
  3. Make sure you are on the “Change Key” menu and click in the search bar in KeyRemap4Macbook, not the search for System Preferences.
  4. Type “eject” in the search bar and check the box next to “Eject to Command+Control+Option+Shift+E”
  5. Exit System Preferences and open Automator.
  6. Choose the template “Service” and hit “Choose” at the bottom right.
  7. In the search bar at the top left, type “Run Shell Script”
  8. Drag “Run Shell Script” from the left to the Workflow Area.
  9. At the top above “Run Shell Script” click the arrows next to “Service receives selected text” and pick “no input” at the bottom of the list.
  10. Next delete “cat” from the Shell Script and type this “drutil eject”
  11. While in Automator go File > Save As > Eject
  12. Close Automator and open System Preference > Keyboard > Keyboard Shortcuts
  13. In Keyboard Shortcuts choose Services in the left box.
  14. In the right, scroll down to “General” and you should see “Eject” listed.
  15. Make sure the box beside “Eject” is checked and double click on the right side, left of the scroll bar. This should open text box where you hold down Command+Control+Option+Shift+E. This will enter those keys as shown here.
  16. Restart the operating system.
  17. Close System Preferences and the Eject key should now eject your external cd/dvd/blu ray drive.


AppleJack for Mac

Macs generally don’t have startup problems, but it’s good to be prepared in case your Mac OS X computer won’t start.

The normal steps for trying to get a Mac to boot involve pressing keyboard shortcuts during the boot process. From Apple’s keyboard shortcuts page:

Startup keyboard shortcuts

Press the key or key combination until the expected function occurs/appears (for example, hold Option during startup until Startup Manager appears, or Shift until “Safe Boot” appears). Tip: If a startup function doesn’t work and you use a third-party keyboard, connect an Apple keyboard and try again.

Key or key combination What it does
Option Display all bootable volumes (Startup Manager)
Shift Perform Safe Boot (start up in Safe Mode)
C Start from a bootable disc (DVD, CD)
T Start in FireWire target disk mode
N Start from NetBoot server
X Force Mac OS X startup (if non-Mac OS X startup volumes are present)
Command-V Start in Verbose Mode
Command-S Start in Single User Mode

My first step to fixing a Mac that is stuck on the gray boot screen is to hold the Option key and attempt to chose the hard drive to boot. If that fails, I will try to either boot into Safe Mode or from an external firewire hard drive, allowing me to fix things.

Extra startup help from AppleJack

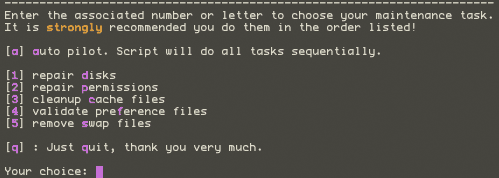
AppleJack is a free troubleshooting assistant that you need to install prior to your computer having problems. It gives you a DOS-like Menu of options that can fix common problems. You can repair the disk, repair permissions, remove cache files, validate preference files, and remove swap files.

Download AppleJack from the download page. Run the AppleJack installer. It only takes 74K of space for the current version as of this writing, 1.6.

To start AppleJack, first hold Command and S keys at startup. This starts Single User Mode as mentioned above. Then type one these commands.

Command What it does
applejack start the AppleJack menu (see image below)
applejack auto run through all the menu tasks automatically
applejack auto restart run through all the menu tasks automatically, then restart

Only use AppleJack when your computer will not start because changing these basic parts of the operating system can introduce other problems. Still, I install AppleJack on all my Macs for the extra help it can provide.

For more info, see the AppleJack SourceForge page, this CNET article which explains what each command is doing, or this page of user experiences.